
|
|
| Brand Name: | Tendars |
| Model Number: | Truss Frame |
| MOQ: | 25 square meters |
| Price: | Reconsideration |
| Packaging Details: | 1, The aluminium frame structure packed into the bubble film 2, the pvc fabric roof cover and sidewalls are packed into the PVC fabric carry bag; 3, Hardware packed into the box. |
| Payment Terms: | L/C, T/T, Western Union, MoneyGram |
![]()
![]()
|
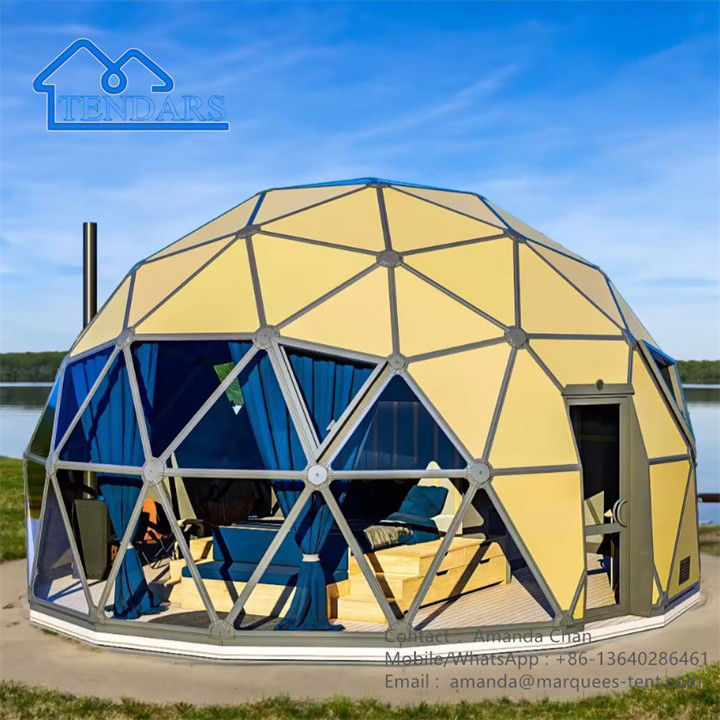
Frame Material |
Steel Q235, hot-dip, double sided galvanized, powder coated white |
|||
|
Structure Frame Finish |
Powder Finish, high-end and elegant |
|||
|
Pipe Diameter |
Q25*1.5mm |
|||
|
Connecting Bolts |
M10 |
|||
|
Roof Cover |
Double Side PVC Coated Polyester Fabric |
|||
|
650g/m²(non-opaque), 850g/m²(opaque) |
||||
|
Wind Resistance |
100km/h(0.5KN/m²) |
|||
|
Snow Load |
25-75 kg/sqm |
|||
|
Color/Colour |
As picture, Accept customized |
|
Capacity |
2/3/4/5/6/7/8 people(customized capacity) |
|
Size |
Can choose the size of off-the-shelf products, Accept customized size |
|
Feature |
UV&Rain Resistant,Breathable,Prevent Splendid, Large Space,Stable Structure, Good Ventilation Performance, Wide Application,Small Size, Easy To Carry,Setup,Easy Popup,Automatic,Comfortable |
![]()
1. Site Preparation:
Select a Suitable Location: Choose a flat, level area free from debris, sharp objects, and potential hazards. Ensure that the site is stable and can support the weight of the tent and its occupants.
Clear the Area: Remove any vegetation, rocks, or other obstructions. Level the ground if necessary to create a stable base for the tent.
2. Unpack and Inspect:
Check Components: Unpack all parts of the geodesic dome tent, including the frame, cover, groundsheet, and any additional accessories. Verify that all components are present and in good condition according to the manufacturer’s checklist.
Inspect for Damage: Examine the frame and cover for any signs of damage or wear. Address any issues before beginning the installation.
3. Lay Out the Groundsheet:
Position the Groundsheet: Spread the groundsheet or tent base over the prepared site. Ensure it is positioned correctly and lies flat. This will act as a barrier between the ground and the tent’s interior.
4. Assemble the Frame:
Identify Frame Parts: Separate and organize the frame components, including the hubs, struts, and connectors. Familiarize yourself with the assembly instructions provided by the manufacturer.
Assemble Sections: Begin assembling the frame sections according to the instructions. Connect the struts to the hubs and ensure that all connections are secure. Typically, the frame will be constructed in sections that are then connected together.
5. Position the Frame:
Erect the Frame: Carefully lift and position the assembled frame over the groundsheet. Ensure that the frame is centered and aligned with the site.
Secure the Frame: Depending on the design, you may need to secure the frame to the ground using stakes or anchors. This step is important for stability, especially in windy conditions.
6. Attach the Dome Cover:
Position the Cover: Drape the dome cover over the assembled frame. Ensure that it aligns correctly with the frame and the groundsheet.
Secure the Cover: Attach the cover to the frame using the provided fasteners, zippers, or clips. Make sure the cover is taut and evenly distributed across the frame.
7. Secure the Tent:
Stake Down the Edges: Secure the edges of the tent cover to the ground using stakes or pegs. This helps to stabilize the tent and prevent it from lifting or shifting.
Check for Proper Tension: Adjust the tension of the cover to ensure it is snug and free of wrinkles. Proper tensioning helps maintain the shape and structural integrity of the dome.
![]()
|


| Brand Name: | Tendars |
| Model Number: | Truss Frame |
| MOQ: | 25 square meters |
| Price: | Reconsideration |
| Packaging Details: | 1, The aluminium frame structure packed into the bubble film 2, the pvc fabric roof cover and sidewalls are packed into the PVC fabric carry bag; 3, Hardware packed into the box. |
| Payment Terms: | L/C, T/T, Western Union, MoneyGram |
![]()
![]()
|
Frame Material |
Steel Q235, hot-dip, double sided galvanized, powder coated white |
|||
|
Structure Frame Finish |
Powder Finish, high-end and elegant |
|||
|
Pipe Diameter |
Q25*1.5mm |
|||
|
Connecting Bolts |
M10 |
|||
|
Roof Cover |
Double Side PVC Coated Polyester Fabric |
|||
|
650g/m²(non-opaque), 850g/m²(opaque) |
||||
|
Wind Resistance |
100km/h(0.5KN/m²) |
|||
|
Snow Load |
25-75 kg/sqm |
|||
|
Color/Colour |
As picture, Accept customized |
|
Capacity |
2/3/4/5/6/7/8 people(customized capacity) |
|
Size |
Can choose the size of off-the-shelf products, Accept customized size |
|
Feature |
UV&Rain Resistant,Breathable,Prevent Splendid, Large Space,Stable Structure, Good Ventilation Performance, Wide Application,Small Size, Easy To Carry,Setup,Easy Popup,Automatic,Comfortable |
![]()
1. Site Preparation:
Select a Suitable Location: Choose a flat, level area free from debris, sharp objects, and potential hazards. Ensure that the site is stable and can support the weight of the tent and its occupants.
Clear the Area: Remove any vegetation, rocks, or other obstructions. Level the ground if necessary to create a stable base for the tent.
2. Unpack and Inspect:
Check Components: Unpack all parts of the geodesic dome tent, including the frame, cover, groundsheet, and any additional accessories. Verify that all components are present and in good condition according to the manufacturer’s checklist.
Inspect for Damage: Examine the frame and cover for any signs of damage or wear. Address any issues before beginning the installation.
3. Lay Out the Groundsheet:
Position the Groundsheet: Spread the groundsheet or tent base over the prepared site. Ensure it is positioned correctly and lies flat. This will act as a barrier between the ground and the tent’s interior.
4. Assemble the Frame:
Identify Frame Parts: Separate and organize the frame components, including the hubs, struts, and connectors. Familiarize yourself with the assembly instructions provided by the manufacturer.
Assemble Sections: Begin assembling the frame sections according to the instructions. Connect the struts to the hubs and ensure that all connections are secure. Typically, the frame will be constructed in sections that are then connected together.
5. Position the Frame:
Erect the Frame: Carefully lift and position the assembled frame over the groundsheet. Ensure that the frame is centered and aligned with the site.
Secure the Frame: Depending on the design, you may need to secure the frame to the ground using stakes or anchors. This step is important for stability, especially in windy conditions.
6. Attach the Dome Cover:
Position the Cover: Drape the dome cover over the assembled frame. Ensure that it aligns correctly with the frame and the groundsheet.
Secure the Cover: Attach the cover to the frame using the provided fasteners, zippers, or clips. Make sure the cover is taut and evenly distributed across the frame.
7. Secure the Tent:
Stake Down the Edges: Secure the edges of the tent cover to the ground using stakes or pegs. This helps to stabilize the tent and prevent it from lifting or shifting.
Check for Proper Tension: Adjust the tension of the cover to ensure it is snug and free of wrinkles. Proper tensioning helps maintain the shape and structural integrity of the dome.
![]()

